|
Killing Fields - Level 6 This is a mid-sized level
with an outdoors setting for the most part. Your objective in this level is to find the
four keys needed to exit this level.
 You begin this level in a high plateau over looking a small pool of water. To
the right you see a short path heading downward that leads to a small cave that holds an
Uzi and some shotgun shells. As you walk to the left, you'll see a ledge with a Riot Gun
and a medkit. As you walk to the left of that ledge, the path leads toward a portable
medkit. Grab the medkit and drop down from that ledge and pick up the Missile Launcher.
Walk due south and you'll come to some vines hanging from the cliff ahead of you that you
can climb. Now you are back on the ledge where you found the Riot Gun. Walk to the east
toward the flame shooting out of the ground and get ready to battle some baddies. Continue
walking around to the left and you'll come across an explosive barrel in front of a
bridge. If the barrel explodes, the bridge will be destroyed and you'll have to jump
across the gap to get to the other side. You begin this level in a high plateau over looking a small pool of water. To
the right you see a short path heading downward that leads to a small cave that holds an
Uzi and some shotgun shells. As you walk to the left, you'll see a ledge with a Riot Gun
and a medkit. As you walk to the left of that ledge, the path leads toward a portable
medkit. Grab the medkit and drop down from that ledge and pick up the Missile Launcher.
Walk due south and you'll come to some vines hanging from the cliff ahead of you that you
can climb. Now you are back on the ledge where you found the Riot Gun. Walk to the east
toward the flame shooting out of the ground and get ready to battle some baddies. Continue
walking around to the left and you'll come across an explosive barrel in front of a
bridge. If the barrel explodes, the bridge will be destroyed and you'll have to jump
across the gap to get to the other side.
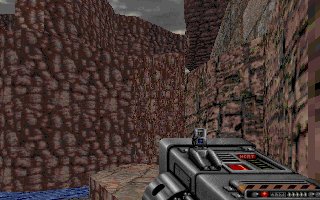
Picture: There are a few vines that can be
climbed!
 This level is full of ledges and cliffs which make great sniper spots so be
sure to watch out for enemy snipers around you. Continue across the bridge until you enter
the other side. There is a stairway leading downward that you must follow. Prepare to find
enemies including Coolies in this area. As you walk downward, you can see a small cave to
your left that has an Uzi, a clip and a medkit. As you reach the bottom of these stairs,
you'll see another set of stairs to your right leading upwards. If possible, do not blow
up the barrels on these steps as they will cause a bridge above them to collapse. If the
bridge does collapse, you'll have to jump across to the ledge that has a Railgun where the
bridge connected. At the top of the stairs, you see a door that takes a gold key ahead of
you. There will also be some enemies guarding this entire area, so be prepared for battle. This level is full of ledges and cliffs which make great sniper spots so be
sure to watch out for enemy snipers around you. Continue across the bridge until you enter
the other side. There is a stairway leading downward that you must follow. Prepare to find
enemies including Coolies in this area. As you walk downward, you can see a small cave to
your left that has an Uzi, a clip and a medkit. As you reach the bottom of these stairs,
you'll see another set of stairs to your right leading upwards. If possible, do not blow
up the barrels on these steps as they will cause a bridge above them to collapse. If the
bridge does collapse, you'll have to jump across to the ledge that has a Railgun where the
bridge connected. At the top of the stairs, you see a door that takes a gold key ahead of
you. There will also be some enemies guarding this entire area, so be prepared for battle.
Picture: The gold key is the first of four
keys you will need in this level.
After clearing this area of enemies, go into
the corridor that is heading southwest. Continue down this short hall until you enter the
cavern at the end. As you know, Rippers are known to lurk in dark places such as this so
prepare to face at least one. Once inside the cavern, turn to the right and walk down
until you can see a hall corridor ahead of you. As you walk forward into this corridor,
you'll notice that the floor is lit across by every set of columns. There are also lit
areas that cross the other direction midway between the columns. Each time you walk across
these lit areas, the wall behind you will shoot arrows out from the traps. You must avoid
the arrow attacks when crossing these lit areas. Once you get past the arrow traps, the
hallway ends with stairs that go upwards to the left. On top of a stone block is a
Guardian Head which you will need as when you reach the top of the stairs an explosion
will trigger and Red Ninjas will pop out from the walls where the explosions occurred.
After killing the Ninjas, walk forward and grab the gold key on the stone block at the end
of the hall and jump out of one of the holes in the walls to the east.
 Now you are back in the area where you first dropped down at the beginning of
the level again. Go ahead and follow the same path you took that brought you to the gold
key door. When you open the gold door there is a Giant Ripper inside protecting the silver
key. I suggest that you fire at him when the door is open and try not to draw him out of
the room or go into the room yourself. Once you have killed him, go inside and grab the
silver key that is on the floor to the north. There is also a fortune cookie on the floor
before the planter to the west, caltrops and Sticky bombs in the north side of the room,
and a Riot Gun in the planter in the west side of the room and an Uzi on the ledge near
the Riot Gun. Now you are back in the area where you first dropped down at the beginning of
the level again. Go ahead and follow the same path you took that brought you to the gold
key door. When you open the gold door there is a Giant Ripper inside protecting the silver
key. I suggest that you fire at him when the door is open and try not to draw him out of
the room or go into the room yourself. Once you have killed him, go inside and grab the
silver key that is on the floor to the north. There is also a fortune cookie on the floor
before the planter to the west, caltrops and Sticky bombs in the north side of the room,
and a Riot Gun in the planter in the west side of the room and an Uzi on the ledge near
the Riot Gun.
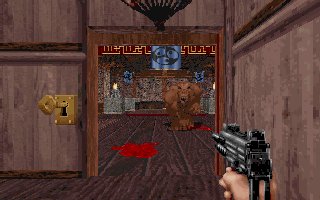
Picture: Can you get by this mammoth to
get the silver key inside?
 Next exit the gold key room and continue walking east to the stairs that lead
upwards. Once you've reached the top of the stairs, now would be a good time to grab the
Railgun if you have not already done so. If the bridge is still intact, follow the path
around to the right and walk across the bridge and grab the gun. If the bridge has been
destroyed, you can make a running jump across to the ledge where the gun is as well. Now
make your way back and go to the right where you can see a high waterfall. Stay to the
right edge of the cliff heading downward until you reach the silver key door. Next exit the gold key room and continue walking east to the stairs that lead
upwards. Once you've reached the top of the stairs, now would be a good time to grab the
Railgun if you have not already done so. If the bridge is still intact, follow the path
around to the right and walk across the bridge and grab the gun. If the bridge has been
destroyed, you can make a running jump across to the ledge where the gun is as well. Now
make your way back and go to the right where you can see a high waterfall. Stay to the
right edge of the cliff heading downward until you reach the silver key door.
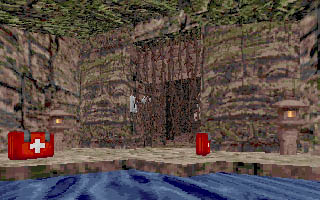
Picture: The silver key door is well
hidden by hanging vines.
Once inside the silver door, a variety of
enemies are poised to attack. Beware of Coolie ghosts particularly. The first thing you'll
notice inside the silver door is a statue straight ahead. Go to the left of the statue and
then face south. From this spot you'll have room to maneuver while fighting off enemies.
Once you've taken care of them, walk forward and go to the right opening separated by a
pillar until you've reached the room that has a Riot Gun on the floor. Now walk out of the
room staying close to the right wall. As you walk around, you should take notice of some
vines that are hanging down along the wall. You can climb these vines to reach a small
ledge which hods a fortune cookie and a nuke warhead. After grabbing these goodies, climb
back down and continue walking along the right side of the wall until you can see an open
area with a set of steps leading up into a small tower. Take those stairs and grab the
Grenade Launcher on the floor in the tower. Now walk back down the steps again staying
close to the right wall.
Picture: The red key awaits you in this
fire filled area.
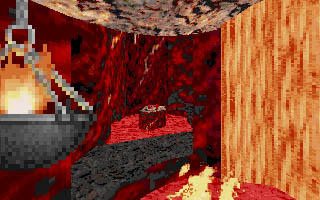 Continue walking along to the right until you come into a room where you can
see a lava river. Once inside of this room, be aware of the lava balls that are spewed
from the lava as they will cause tremendous damage if they hit you. To the east you can
see a ladder where a majority of the lava balls seem to be landing. If you choose to go up
this ladder, prepare to face a Ripper and perhaps more enemies. There are also Sticky
Bombs and a medkit in that area. Now walk south and jump up into the cavern where the
molten lava walls and lava pools are. Jump to the next landing avoiding the lava. Now you
can see a red key. Jump onto where the red key is located and retrieve it. If you like,
you can jump across from this location to where you can see a Railgun and medkits. Now go
back out the way you came in and once again follow along to the right until you come to a
red key door. Continue walking along to the right until you come into a room where you can
see a lava river. Once inside of this room, be aware of the lava balls that are spewed
from the lava as they will cause tremendous damage if they hit you. To the east you can
see a ladder where a majority of the lava balls seem to be landing. If you choose to go up
this ladder, prepare to face a Ripper and perhaps more enemies. There are also Sticky
Bombs and a medkit in that area. Now walk south and jump up into the cavern where the
molten lava walls and lava pools are. Jump to the next landing avoiding the lava. Now you
can see a red key. Jump onto where the red key is located and retrieve it. If you like,
you can jump across from this location to where you can see a Railgun and medkits. Now go
back out the way you came in and once again follow along to the right until you come to a
red key door.
 Once you open the red key door, beware the ledges on the left. If you fall
off from there, you're toast. Take a hard right after killing the enemies that need to be
dealt with and jump onto the short wall that separates this area. You can see the bronze
key on a stone in the middle of a lava pool. You can also see a Guardian Head on a ledge
to the right. Jump onto the ledge where the head is and grab it. Next turn to where the
key is and jump onto the stone grabbing the key and then off onto the ground. Now walk
toward the red key door on this side of the wall, open it and walk out. Once you open the red key door, beware the ledges on the left. If you fall
off from there, you're toast. Take a hard right after killing the enemies that need to be
dealt with and jump onto the short wall that separates this area. You can see the bronze
key on a stone in the middle of a lava pool. You can also see a Guardian Head on a ledge
to the right. Jump onto the ledge where the head is and grab it. Next turn to where the
key is and jump onto the stone grabbing the key and then off onto the ground. Now walk
toward the red key door on this side of the wall, open it and walk out.
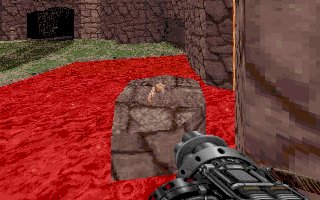
Picture: The bronze key and a fortune
cookie sit atop this stone in the middle of a lava pool.
Again go to the right walking down the steps.
Continue walking downward to the bottom of the steps. If any enemies are there, the
barrels can now be shot to clear the way for you. Now walk up the steps that lead to the
gold door and turn left at the top of the steps to the bronze key door. Open the door
killing any enemies inside and turn to the Shadow Warrior exit to your left and exit the
level. On
to Level 7
|


