|
Auto Maul - Level 22 (Secret
Level) This is one of the two
secret levels hidden within Shadow Warrior. Your objective is to find the four key cards
needed to complete this level and continue onward.
You start this level just inside of a hallway.
Straight ahead of you are explosive barrels and enemies behind them taking shots at you.
Shot the barrels and the explosion will kill the enemies. As you walk forward into the
hallway, Enemies will be taking shots at you from the left. There are also barrels there
you can shoot. A portable medkit is hidden inside one of these barrels and will be ejected
toward you when the barrel explodes. Next, walk forward into the cafeteria. When you turn
into the cafeteria itself, enemies will be firing upon you. Clear this room out and you
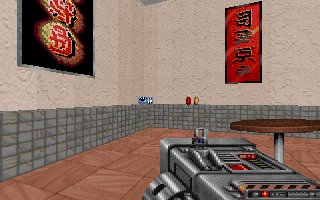
will find a blue key card in the northwest corner of the cafeteria. Be sure to grab the
fortune cookie near the register of the oriental food stand and any other items in the
rest of this room.
Picture: The blue card is in the cafeteria.
 As you walk north out of the cafeteria, more
enemies behind barrels will be shooting at you. Shot the barrels and kill the enemies near
them at the same time. As you walk into this next area, watch for more enemies, especially
elusive coolie ghosts. When you get to the end of this hallway, you'll come to a steel
curtain which leads to a hub with a silver truck in the center and three other curtains
leading different directions. Be aware of enemies inside this hub as you enter it. As you walk north out of the cafeteria, more
enemies behind barrels will be shooting at you. Shot the barrels and kill the enemies near
them at the same time. As you walk into this next area, watch for more enemies, especially
elusive coolie ghosts. When you get to the end of this hallway, you'll come to a steel
curtain which leads to a hub with a silver truck in the center and three other curtains
leading different directions. Be aware of enemies inside this hub as you enter it.
The truck in the center of the hub has an Uzi
and a Railgun in the bed. The curtain to the right of the one you just entered requires
the blue key card you just retrieved. Open the curtain and then walk backwards a few
steps. Shoot all the enemies in sight and then slowly walk back up to the curtain and
shoot the enemies to your right. Once this area has been cleared, walk to the office area
to the right and grab the Missile Launcher and Uzi clips. Behind the red show car, there
are also shotgun shells and a medkit.
Picture: A sales girl shows off the convertible with a red card on
its hood.
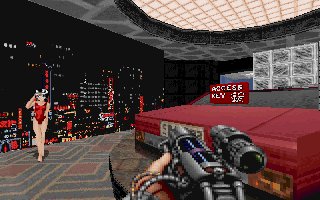 As you continue forward into the next area,
again watch for attacks and enter cautiously. The next vehicle you come across is a red
truck which has a case of Sticky Bombs in the bed. Continue walking up the ramp when you
reach the end of this hall and you'll see a red convertible with a Riot Gun in the
backseat and the red key card on the hood. Grab the items you need and go back to the hub. As you continue forward into the next area,
again watch for attacks and enter cautiously. The next vehicle you come across is a red
truck which has a case of Sticky Bombs in the bed. Continue walking up the ramp when you
reach the end of this hall and you'll see a red convertible with a Riot Gun in the
backseat and the red key card on the hood. Grab the items you need and go back to the hub.
Go straight across to the south curtain that
has a service sign to the right of it. Open this curtain and fight off the enemies there
and walk to the red key card door. Use your key card, open the door, and walk into the
service waiting room. Shoot the window out between the waiting room and the service garage
and jump inside. Watch out for enemies on the raised platform. Once this room is clear,
jump on the workbench and then onto the platform and grab the items there. Now drop back
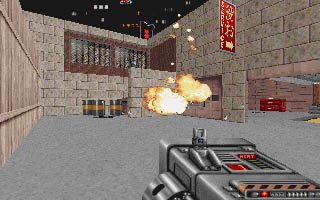
down on the floor and activate the switch on the south side. The garage door will open
into a yard and enemies will be there. Shoot the barrels killing the enemies and then walk
north to the dumpster.
Picture: Shoot the exploding barrels and kill the hiding enemies.
 Jump into the dumpster. On the short wall to
the south there is an armor suit. On the north side there are two windows. Jump onto the
window ledge and then over to the far window and jump into it. Stay on top of the ledge up
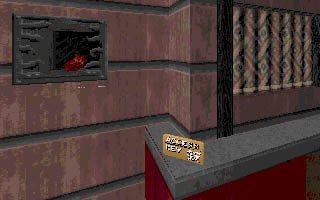
high and shoot any enemies from this position. Now turn to your right facing east and you
can see the yellow key card on the ledge corner. When you reach the key card, you can also
see a vent grating close by. Shoot the grating and jump inside and grab a Ripper Heart.
Now jump onto the floor and walk up the ramp and down the hallway. You can see the exit
there, but it requires the green key card to enter inside the steel barrier blocking it.
The curtain on the other side of this hallway also requires the green key card, so jump
back into the window you entered this room from and make your way back through the service
garage to the hub again. Jump into the dumpster. On the short wall to
the south there is an armor suit. On the north side there are two windows. Jump onto the
window ledge and then over to the far window and jump into it. Stay on top of the ledge up
high and shoot any enemies from this position. Now turn to your right facing east and you
can see the yellow key card on the ledge corner. When you reach the key card, you can also
see a vent grating close by. Shoot the grating and jump inside and grab a Ripper Heart.
Now jump onto the floor and walk up the ramp and down the hallway. You can see the exit
there, but it requires the green key card to enter inside the steel barrier blocking it.
The curtain on the other side of this hallway also requires the green key card, so jump
back into the window you entered this room from and make your way back through the service
garage to the hub again.
Picture: The yellow key card sits up on the corner of the ledge.
 Once you are in the hub, walk to the east
curtain that is to your right. Walk into this hallway and stay to the right where you can
see a yellow key card slot. Walk into this alcove and use the key card and open the door
ahead of you. Fight off all attacks and you'll see the green key card in the corner of the
desk. There is also a medkit on top of the file cabinets and a vent grate above it that
hold a Riot Gun inside. If you shoot the computer case on the desk, you can also get a RAM
heat seeker card inside. Once you are in the hub, walk to the east
curtain that is to your right. Walk into this hallway and stay to the right where you can
see a yellow key card slot. Walk into this alcove and use the key card and open the door
ahead of you. Fight off all attacks and you'll see the green key card in the corner of the
desk. There is also a medkit on top of the file cabinets and a vent grate above it that
hold a Riot Gun inside. If you shoot the computer case on the desk, you can also get a RAM
heat seeker card inside.
Picture: green key card and a RAM heat
seeker card are on the desk.
 Now go back out the same door you entered and make your way back to
the hub again. The green key card curtain is straight across to the west. Use your card
and open the curtain. Prepare for attacking enemies. Once they are cleared, slowly make
your way up the ramp. As you approach the top, a Sumo boss will be there ready to stop
you. Act quickly and run back down to the hub and use the pillars there to guard yourself
from his attacks and fire upon him when you have openings. When you have defeated him, go
back up the ramp, open the barrier and exit the level. Now go back out the same door you entered and make your way back to
the hub again. The green key card curtain is straight across to the west. Use your card
and open the curtain. Prepare for attacking enemies. Once they are cleared, slowly make
your way up the ramp. As you approach the top, a Sumo boss will be there ready to stop
you. Act quickly and run back down to the hub and use the pillars there to guard yourself
from his attacks and fire upon him when you have openings. When you have defeated him, go
back up the ramp, open the barrier and exit the level.
|


