|
Dark Woods of the Serpent - Level
4 Dark Woods of the Serpent
is a large level with mainly an outdoors setting much like Master Leep's Temple was. Your
objective in this level is to find 3 keys and solve a few clever puzzles. When you exit
the ramp that you entered at the end of level 3, you are in a corridor that will lead you
to a dojo and to your first key. Right away...there is a hatch in the wall where you can
pick up a Riot Gun. As you proceed down the hallway, take the first right and head into
the dojo. Once you are in the open area of the dojo, you'll see a ladder to your left.
Climb the ladder and go either right or left until you can enter another hallway which
leads back around behind the ladder in the upper area. You can see the bronze key in an
inaccessible area along with a switch. Hit the switch and go back down the ladder.
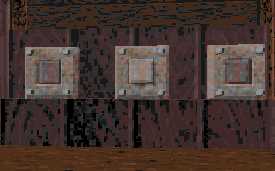 Go straight across from where the ladder is and turn to your right.
You'll see three switches on that wall. Hit the outside two switches and you'll hear a
gong sound. On the opposite wall from the switches are two hatches that both hold shotgun
shells. Now that you've hit the switches.....go back up the ladder and go back to where
you saw the bronze key. Now you'll see another switch. Hit that switch and the carrousel
will rotate open giving you access to the bronze key. Now that you have the key, go back
to the hallway that borders the dojo until and walk along it until you find the bronze key
door. Open the door and you'll be outside of the dojo in the woods. Go straight across from where the ladder is and turn to your right.
You'll see three switches on that wall. Hit the outside two switches and you'll hear a
gong sound. On the opposite wall from the switches are two hatches that both hold shotgun
shells. Now that you've hit the switches.....go back up the ladder and go back to where
you saw the bronze key. Now you'll see another switch. Hit that switch and the carrousel
will rotate open giving you access to the bronze key. Now that you have the key, go back
to the hallway that borders the dojo until and walk along it until you find the bronze key
door. Open the door and you'll be outside of the dojo in the woods.
Picture: The combination to the switches
to get the bronze key.
Head straight ahead into the Dark Woods
heading south and then turn to the east. You'll see a sign the reads, "Dark
Woods". Turn to your right and proceed to the shack with the warning sign posted in
front of the door. Open the door and quickly run and get the gold key and run back out.
Now go back out the Dark Woods and head east
and go under the tree trunk to the where the gold key door is. Open this door and head
into the woods. Stay to the left until you reach a well. Jump into the well and dive down
into the water and head south as far as you can and swim to the surface. There is a red
key door to the north and a mural to the east with a switch to the right of it. Hit the
switch and the mural will lower and a bin with water will move next to the door. Jump on
the bin and then onto the mural. You'll grab the red key on that mural. Now use the red
key to open the door.
From exiting this door, head north-west until
the well is to the left of you, then turn to the right and walk towards anther set of
doors that require the red key and proceed through the door.
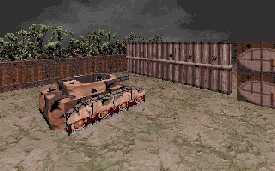 Go along the path to the to the east as far as you can. The path
opens up into a large courtyard with a damaged tank in it. There is a fence straight
across from the tank to the south which you need to get by to continue in this level.
There are two ways to get by this fence. You can blast it down with some missiles...or you
can get a repair kit and repair the tank and blast it down with the tank's firing
missiles. Go along the path to the to the east as far as you can. The path
opens up into a large courtyard with a damaged tank in it. There is a fence straight
across from the tank to the south which you need to get by to continue in this level.
There are two ways to get by this fence. You can blast it down with some missiles...or you
can get a repair kit and repair the tank and blast it down with the tank's firing
missiles.
Picture: The fence that blocks the way.
Destroy it!
If you need a repair kit....you'll need to go
back to the path and turn to your right as soon as you go through the tunnel. There is a
building to the right that has a door that won't open. Walk around to the back of that
building until you can see the door through the bars and the barrel blocking the door.
Shoot the barrel and blow the door open. Go inside the room and hit the switch. When you
go back out of the room, go to the south and you'll see a door about half way down the
aisle you are walking down on your right hand side. Turn to your right through the door
and you'll see a repair kit next to the pool. Now that you've blown the fence down and
killed all the enemies in this area, there is another building with a door you cannot
open. This door needs to be blasted open as well. Once inside of this room, go around the
wall until you come to the raised platform with the grenades on it and grab the grenades.
A secret portal will open. Go into the portal to continue your journey.
We pick up from the portal that transports you
to Ripper Valley. First of all, head towards the waterfall to the north and jump on the
ledges until you can jump on the top of the waterfall. Once inside this cavern, head to
the south to the opening and jump down. Walk to the west side of this area and then go north to a cave where a magic
carpet is floating mid-air in the center of a cliff. Jump on the magic carpet and it
starts to take you through the this impassible area.
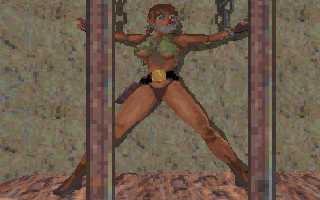
As you travel through this cavern, there is a
spot where you can jump off of the carpet to a small area that holds a few weapons and a
Tomb Raider reference.
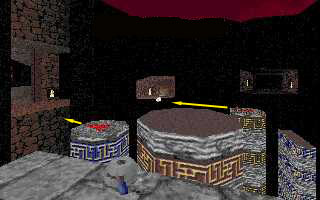
 When you continue onward, the carpet takes up
into the last portion of the level. As you walk to the west up an incline, you'll come
across a switch about half way where the walkway levels off. Activate the switch and two
controls are exposed. These controls maneuver the two colored pillars in the middle of
this bottomless pit they are located in. The trick is to move the pillars to where you can
jump on them to gain access to the areas across the pit. This is a fairly difficult puzzle
which will no doubt require a lot of saving and restoring. You have to position yourself
over the control and then hit the space key or whatever you have assigned the
"use" key to be. Your view will change so that you are in the control mode. To
stop using the control, just hit the space key again. I suggest you first go to the
control to the right and move the blue pillar between the center stationary pillar and the
area down the ramp to the east. Here's where I suggest you start saving your game. Go down
to the east and see if you have the pillar positioned to where you can jump onto it and
then to the center. Once this pillar is set, it will not have to be moved again. When you continue onward, the carpet takes up
into the last portion of the level. As you walk to the west up an incline, you'll come
across a switch about half way where the walkway levels off. Activate the switch and two
controls are exposed. These controls maneuver the two colored pillars in the middle of
this bottomless pit they are located in. The trick is to move the pillars to where you can
jump on them to gain access to the areas across the pit. This is a fairly difficult puzzle
which will no doubt require a lot of saving and restoring. You have to position yourself
over the control and then hit the space key or whatever you have assigned the
"use" key to be. Your view will change so that you are in the control mode. To
stop using the control, just hit the space key again. I suggest you first go to the
control to the right and move the blue pillar between the center stationary pillar and the
area down the ramp to the east. Here's where I suggest you start saving your game. Go down
to the east and see if you have the pillar positioned to where you can jump onto it and
then to the center. Once this pillar is set, it will not have to be moved again.
Picture: The pillar puzzle. Move the pillers along the path of
the arrows.
 Next go to the control for the yellow pillar
to the left. Move it towards the blue pillar until you have it positioned between the
center pillar and the ledge across from this control. Once again.....save before
attempting to make this jump. Once you positioned this pillar in the right spot, hit the
button in the wall and walk behind the wall that opens up when the chair rotates. Go to
the end of this narrow hallway and activate the switch there. Then go back through the
rotating wall using the switch on the hallway side and head back up to the yellow pillar
control again. Once there, save your game again. In front of the ledge across the blue
pillar control, you'll see that the switch you just activated causes a ledge to move up
and down in front of that ledge. You need to move the yellow pillar back to where you can
jump from the center pillar to that moving ledge. Once you move the yellow pillar to the
correct spot, all you have to do is time your jump from the yellow pillar to the moving
ledge and from the moving ledge to the ledge across from it. Jump from the yellow pillar
to the moving ledge when the ledge is in the lower position and jump from the moving ledge
to the ledge across when the moving ledge is at the top. Once you've made it across, save
your game again. Next go to the control for the yellow pillar
to the left. Move it towards the blue pillar until you have it positioned between the
center pillar and the ledge across from this control. Once again.....save before
attempting to make this jump. Once you positioned this pillar in the right spot, hit the
button in the wall and walk behind the wall that opens up when the chair rotates. Go to
the end of this narrow hallway and activate the switch there. Then go back through the
rotating wall using the switch on the hallway side and head back up to the yellow pillar
control again. Once there, save your game again. In front of the ledge across the blue
pillar control, you'll see that the switch you just activated causes a ledge to move up
and down in front of that ledge. You need to move the yellow pillar back to where you can
jump from the center pillar to that moving ledge. Once you move the yellow pillar to the
correct spot, all you have to do is time your jump from the yellow pillar to the moving
ledge and from the moving ledge to the ledge across from it. Jump from the yellow pillar
to the moving ledge when the ledge is in the lower position and jump from the moving ledge
to the ledge across when the moving ledge is at the top. Once you've made it across, save
your game again.
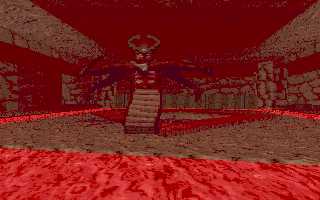 Follow the path to the end and then turn to the south and jump into
the opening. This is where you'll meet the Serpent Boss and he's one tough SOB! I suggest
you arm your missile launcher with a "nuke" and hit the boss with it with your
first attack. Then you just have to run around the outside of the level avoiding his
attacks and hitting him with missiles until he runs away scared and you've defeated the
shareware version of Shadow Warrior. Congratulations!!! Follow the path to the end and then turn to the south and jump into
the opening. This is where you'll meet the Serpent Boss and he's one tough SOB! I suggest
you arm your missile launcher with a "nuke" and hit the boss with it with your
first attack. Then you just have to run around the outside of the level avoiding his
attacks and hitting him with missiles until he runs away scared and you've defeated the
shareware version of Shadow Warrior. Congratulations!!!
On
to Level 5 - the First level of the registered version
|


