|
 Zilla Construction - Level 2 Zilla Construction - Level 2 After moving through the train station, you continue
on to a construction yard in level 2. This level is fairly linear with mainly one level
although there are rooms that have upper and lower sections. Their are three key cards and
one key you'll need to acquire to complete this level.
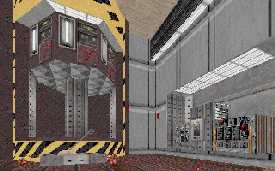
Picture: Zilla Enterprise's Construction
Yard
Starting from the entrance of this level, you
head toward the left toward the crates. You'll notice a door in this area that requires a
yellow key card for access. Make note of this as this will be the first door you'll have a
key card for entrance. As you progress through the crated area, you'll enter a rather open
area where there is a gun turret and a broken forklift. In a red lit area, you see an
outhouse. Go into the outhouse and "use" the toilet paper. This will open a door
in the outhouse that has a switch in it. Here is where you have to use a bit of speed.
Actuate the switch and go out of the outhouse and take a hard right and run up the ramp.
If you are quick enough, the door will be open. Enter this room as you have the
opportunity. Once inside of this room, you'll see another door to the right of the door
you just entered. Open this door and the yellow key card will be on the desk to your
right.
Now that you have the yellow key card, go back
to the yellow key card door and enter. As you enter this room and walk forward, you'll
enter a hallway where you can go to the left or the right. Turn to your left and fire into
the bottles there. They will explode blowing a hole in the wall. As you walk into that
area, you'll see that the red key card is located inside of the wall that was blown out.
You'll also notice two presses to the left. One is an Uzi press and the other is a key
press. You'll need to go back to these presses again, so make note of this area.
Now that you have the red key card, go back to
the hallway and go through the door that you would have entered if you would have gone
right instead of left when you first entered this hallway. If you walk forward and turn to
the left, you'll come across the red key card door.As you enter this door you'll see a
crate dead ahead and a upper room above the crate. If you go to your left, you'll see a
door that requires a gold key for entrance. Make note of this door as you'll be coming
back here once you obtain the gold key.
Now jump on the crate and enter this upper
room. In here you'll find the blue key card. You'll also find a toolkit to repair the
broken forklift if you choose to use the forklift. The forklift is not necessary to
complete the level. You'll also notice a switch in this upper room that opens a panel that
gives access to another crated area in this level that houses quite a few enemies. If you
have already cleared this area of enemies, this panel gives quick access to the blue key
card door.
 At any rate, the blue key card door is in the open area where the
turret and forklift are past the area where the outhouse is located. Now open the blue key
card door and walk down the ramp and turn to your left. You'll see a lever on the
equipment in front of you. Activate the lever then turn to your right and activate the
switch across from the lever. Now you have turned the power on to the construction yard. At any rate, the blue key card door is in the open area where the
turret and forklift are past the area where the outhouse is located. Now open the blue key
card door and walk down the ramp and turn to your left. You'll see a lever on the
equipment in front of you. Activate the lever then turn to your right and activate the
switch across from the lever. Now you have turned the power on to the construction yard.
Picture: Turn on the power! Pull the lever
and throw the switch. The generator will turn on.
 As you exit the blue key card door, go back to the yellow key card
door and go to where the presses are. Use the button to activate the key press. Once the
press has gone through it's process, the gold key will be made. Jump inside of the press
and grab the key and head back to the red key card door. As you exit the blue key card door, go back to the yellow key card
door and go to where the presses are. Use the button to activate the key press. Once the
press has gone through it's process, the gold key will be made. Jump inside of the press
and grab the key and head back to the red key card door.
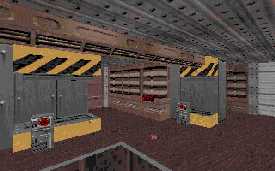
Picture: The presses, the machine on the
left will mold unlimited Uzis, and the press on the right will mold a Gold Key.
Now open the gold key door and walk down the
ramp. Towards the back of this room, you'll see the same type of switch as the Uzi/key
press switches. When you activate this switch the huge drill will activate and drill a
hole underneath it filled with water. As you walk into the hole and swim underneath the
surface, you'll swim into an area where you can see the beginning of the next level.
Continue swimming until the level is completed.
Next, Lo Wang needs to go find Master Leep in
level 3, Master Leep's Temple.
|


