|
Great Escape - Level 17 The next level in your
mission finds Lo Wang captured and held in a prison cell. You must escape the prison in
order to pursue the evil Zilla. To do this, you'll have to find a total of two keys and
two access cards.
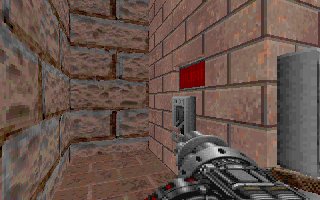
Picture: The first thing to do is find a way out of the cell.
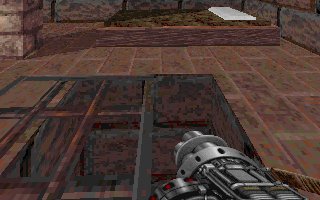 You begin the level inside a locked cell.
There is a grate in the middle of the floor. Use the space key on the grate and it will
open. Jump down the grate and you'll drop into a pool of water. Swim up to the surface and
onto the wooden floor. There are enemies here so take them out and secure this area. Once
you have done that, you should scurry the crates for items. There are a Grenade Launcher,
a medkit, a portable medkit, shurikens, and Sticky Bombs there to collect. After
collecting these items, you'll notice a group of explosive canisters along the west wall.
Go across straight across from them to the east wall as far back as you can and lob a
Sticky Bomb slightly up into the air above them to explode them while you are at a safe
distance from their impact. The wall behind the canisters opens up and a bronze key and a
Guardian Head are in the opening that has been exposed. You begin the level inside a locked cell.
There is a grate in the middle of the floor. Use the space key on the grate and it will
open. Jump down the grate and you'll drop into a pool of water. Swim up to the surface and
onto the wooden floor. There are enemies here so take them out and secure this area. Once
you have done that, you should scurry the crates for items. There are a Grenade Launcher,
a medkit, a portable medkit, shurikens, and Sticky Bombs there to collect. After
collecting these items, you'll notice a group of explosive canisters along the west wall.
Go across straight across from them to the east wall as far back as you can and lob a
Sticky Bomb slightly up into the air above them to explode them while you are at a safe
distance from their impact. The wall behind the canisters opens up and a bronze key and a
Guardian Head are in the opening that has been exposed.
Picture: Lob a sticky bomb at the
tanks from a safe distance.
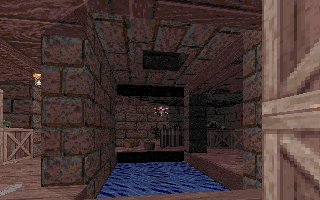 Now drop down back into the water and swim
south. At your first opportunity, swim to the surface and turn to the east and wade over
to the end where you'll see a ladder. Climb the ladder and prepare to fight enemies on the
stone walkway you have climbed. After clearing this zone, you'll find a RAM heat seeker
card and shotgun shells near the ladder. Now walk east and you'll see the bronze key door
ahead of you to the east. Use the key and enter the double doors cautiously. Now drop down back into the water and swim
south. At your first opportunity, swim to the surface and turn to the east and wade over
to the end where you'll see a ladder. Climb the ladder and prepare to fight enemies on the
stone walkway you have climbed. After clearing this zone, you'll find a RAM heat seeker
card and shotgun shells near the ladder. Now walk east and you'll see the bronze key door
ahead of you to the east. Use the key and enter the double doors cautiously.
Battle all enemies inside of the door and then
walk to south and grab the medkit on the lower crate, then jump up upon the highest crate
and grab the missiles and gas bomb. You'll notice as you walk over to these crates a
yellow card door to the right. You'll be needing to use that door after finding the card
for it a little bit further on in this level. Next head north a bit and then west down the
hallway. As you approach the end of the hall, prepare to face enemies on either side of
the hall. After clearing them out, turn to the south into a restroom area. You'll find a
couple medkits in the corner shower area and in the toilet, you'll find a fortune cookie
to boost your health as well. Now go north into the other room and walk onto the table.
Turn to your left facing west and make a running jump on top of the lockers and grab the
Uzi, clip, and armor. After grabbing the armor in the corner of the lockers, turn back
around and face east and proceed cautiously up the ramp. When you reach the top, go into
the door to your left and start following the path from there.
As you approach the second set of steps
winding around this path, prepare again to face more enemies in the long hallway ahead of
you. Stay on top of the steps here and do not go down the hallway ahead of you just yet.
Instead, turn to your right where you'll see two switches and a red card slot between them
on this wall. As you go back down the step on the other side, again prepare to face more
enemies. Now that both hallways are cleared from enemies, continue down this hallway on
the south side. The doors along the right side of the hallway cannot be opened, but if you
shoot through the grate at the end of the hallway, you'll be able to access them in this
hidden duct way.
First jump up into the duct and go to your
left. Follow the duct around and you'll come to another grate that leads into the hallway
on the north side. Continue past this grating a short way and pick up the gas bomb if you
need it. Now travel back the same way you came through the duct until you reach the
grating where you first entered. Continue past this grating and you'll turn to the right
and come into another grating. This grating can be shot out and leads into one of the
three cells on the south side. Before you jump into this cell, shoot any enemies inside
the room while you are still in the duct. Now you can enter this cell and grab the Riot
Gun in front of the sink. Now jump on the wall to the right of the sink and shoot the next
grate out. Jump over inside the broken grate, but not into the next room and take out any
enemies inside before entering. Then jump into this room, grab the Railgun rods and repeat
the same process for the following cell. Once the last cell is cleared from enemies, drop
into the cell and grab the red key card in the corner on the bed. There is also a case of
Sticky Bombs in front of the sink and a medkit near the grating on the floor you may need.
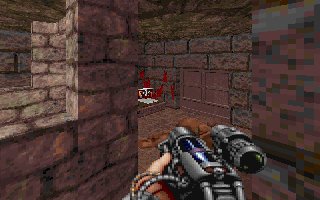
Now jump back through all the grate openings until you reach the duct again.
Picture: The red key card is in one of
the prison cells.
 When you reach the grate where you first
entered the duct, drop back down the hall and head toward the red card slot and use the
card. The switches on the walls will now work. The switch on the right side of the card
slot opens the cells you were just in so there is no need to use it. The switch on the
left opens the rooms on the north hallway side. In the first room down the hall, you'll be
sure to run into a Shadow Ninja. It's probably a good time to save your game progress
before you open any of these cells in case the Shadow Ninja proves to be more than you can
handle. When you reach the grate where you first
entered the duct, drop back down the hall and head toward the red card slot and use the
card. The switches on the walls will now work. The switch on the right side of the card
slot opens the cells you were just in so there is no need to use it. The switch on the
left opens the rooms on the north hallway side. In the first room down the hall, you'll be
sure to run into a Shadow Ninja. It's probably a good time to save your game progress
before you open any of these cells in case the Shadow Ninja proves to be more than you can
handle.
Picture: A Shadow Ninja guards the
yellow key card.
 These doors only stay open a short time before
they close. If you can keep the Shadow Ninja inside of his cell and battle him there, you
might have better luck against him. Just don't leave yourself open for his flash bomb
attack or napalm attack. Once he's no longer a threat, go into this room and grab the
yellow key card. If you are inside this first room when the door closes, you can shoot
through the grating on the left and go through another duct which leads back close to
where the switch is. The other two rooms are not required to enter and are optional. The
middle room down the hall is the cell where you first started this level. There is no need
to go into this cell as if you do and the door closes, you'll have to make your way back
needlessly. The last room down the hall has a Female Warrior to deal with inside. If you
choose to enter this room there is a case of Sticky Bombs and two medkits inside. Once
again there is a grate on the wall that leads into the duct where you can get back to the
hallway. These doors only stay open a short time before
they close. If you can keep the Shadow Ninja inside of his cell and battle him there, you
might have better luck against him. Just don't leave yourself open for his flash bomb
attack or napalm attack. Once he's no longer a threat, go into this room and grab the
yellow key card. If you are inside this first room when the door closes, you can shoot
through the grating on the left and go through another duct which leads back close to
where the switch is. The other two rooms are not required to enter and are optional. The
middle room down the hall is the cell where you first started this level. There is no need
to go into this cell as if you do and the door closes, you'll have to make your way back
needlessly. The last room down the hall has a Female Warrior to deal with inside. If you
choose to enter this room there is a case of Sticky Bombs and two medkits inside. Once
again there is a grate on the wall that leads into the duct where you can get back to the
hallway.
Picture: Activate the switch to kill
the enemies hiding inside the crematoriums.
 Now that you have the yellow car, go back the
way you came until you reach the yellow card door. When you first open this door, there is
a room to your left that is a crematorium. Eliminate any enemies there and enter the room.
You notice two doors with switches on each door. Don't open these doors yet. If you walk
around the left side of the crematoriums, you'll see a medkit on the ground. On the wall
near it you see a switch. This switch turns on the fire inside both crematoriums. Go ahead
and turn it on as there are enemies inside of the crematoriums waiting for you to open the
doors. Fry them and they'll go up in smoke. Now you can open each door and run in quickly
to grab the items hidden inside. Inside the door to the left is kelvar armor. Inside the
right door is a nuclear warhead. Now that you have the yellow car, go back the
way you came until you reach the yellow card door. When you first open this door, there is
a room to your left that is a crematorium. Eliminate any enemies there and enter the room.
You notice two doors with switches on each door. Don't open these doors yet. If you walk
around the left side of the crematoriums, you'll see a medkit on the ground. On the wall
near it you see a switch. This switch turns on the fire inside both crematoriums. Go ahead
and turn it on as there are enemies inside of the crematoriums waiting for you to open the
doors. Fry them and they'll go up in smoke. Now you can open each door and run in quickly
to grab the items hidden inside. Inside the door to the left is kelvar armor. Inside the
right door is a nuclear warhead.
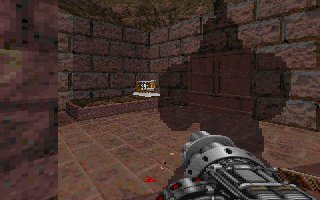
Now go back out and continue down the hall to
the next door. This room seems to be an office. Go behind the desk to where the chair is.
You'll notice a small switch built into the desk. There is a picture on the wall to the
right of the door you entered as you are facing it now. Duck down and hit the switch and
the picture reveals a secret hiding place for the silver key. Quickly grab the key before
the picture pops back up and then make you way back out the yellow card door.
Picture: The switch behind the desk
opens the hiding place for the silver key.
 Now go back through the bronze key door.
You'll be sure to run into a few enemies when you walk into the hallway there so prepare
for them. Next walk east down the hallway until you reach the silver door. Inside of the
silver door, there is a Serpent God ready to stop you from exiting the level. If you can
make your way past him, you will enter a cafeteria where there is a fortune cookie on top
of the table there as well as an Uzi and clips. Use the pillars in the cafeteria as
defense as you unleash punishment on the Serpent God until you finally defeat him. Now the
exit is clear for you to use. Now go back through the bronze key door.
You'll be sure to run into a few enemies when you walk into the hallway there so prepare
for them. Next walk east down the hallway until you reach the silver door. Inside of the
silver door, there is a Serpent God ready to stop you from exiting the level. If you can
make your way past him, you will enter a cafeteria where there is a fortune cookie on top
of the table there as well as an Uzi and clips. Use the pillars in the cafeteria as
defense as you unleash punishment on the Serpent God until you finally defeat him. Now the
exit is clear for you to use.
 Picture: Defeat the Serpent God and the
exit awaits you. Picture: Defeat the Serpent God and the
exit awaits you.
On
to Level 18
|


